
Tap Washer fault is one of the reasons why the traditional or Compression Valves’ primarily come with washer. A damaged washer may cause dripping. Having to hear that unpleasant sound of your kitchen sink tap or bathroom tap dripping is as annoying as the sound itself. Imagine that unfortunate situation taking place when you are behind to complete an assignment or project or you are trying so hard to get some sleep after a long day at work. Don’t worry, there is a chance you can replace the tap washer without having to pay a professional for his services. Follow me as we journey through how to change a tap washer.
![Water Tap Leaking: Causes, Implications and How to Fix [+ Tips]](https://selleys.com.sg/wp-content/uploads/2022/07/Causes-of-a-Leaking-Water-Tap.png)
What Do You Need
- An adjustable spanner
- Slot and cross-head screwdrivers / flat-headed screwdriver
- Pliers
- Various Washers
- Rags or a Mop
Table of Content
- Cover the drain and protect the bath or basin
- Turn off the water
- Remove the top and undo the valve
- Replace the washer tap
- Put the tap back together
Step 1: Cover the drain and protect the bath or basin
The first step on the list is cover the drain and protect the bath or basin. Why is this the first thing to do? With the drain opened, screws and other small particles from the tap as it is opened for repairs may fall and run through the holes or hide and you could later step on them and get injured. To ensure you are on the right path before anything else, place an old towel in the bath or basin and on that those small components from the tap and fall and be secured.
Step 2: Turn off the water
After securing the small components, tap off the water supply. Some baths are built with isolation valves, otherwise you will have to turn it off from the main water supply (which will affect the whole house). You do not want the water overflowing while you are working on exchanging the washer.
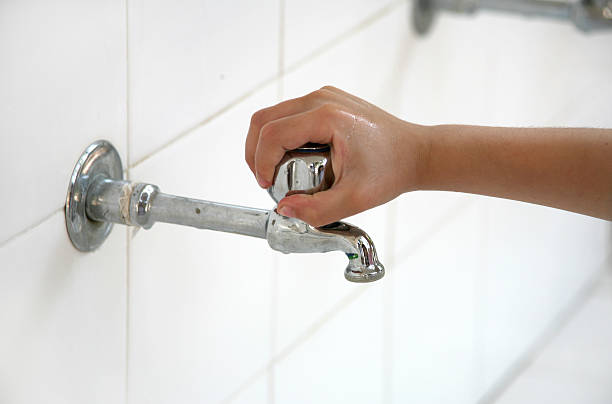
Step 3: Remove the top and undo the valve
Take your slot and cross-head screwdrivers or flat-headed screwdriver whichever works best and remove the tap from the top. Most often with traditional taps, there is a screw holding the tap head so unscrew that and remove the tap head, leaving the valve in sight. For the valve, you will need a spanner to carefully remove it.
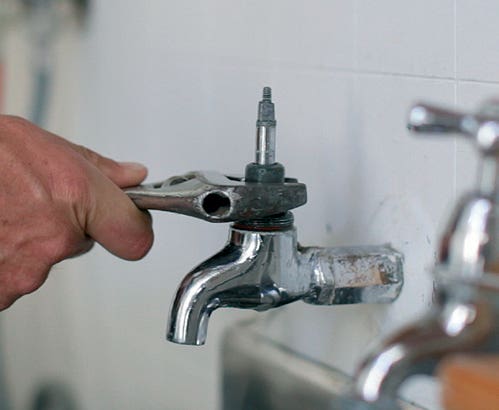
Step 4: Replace the washer tap
Once the valve is no longer in your way, the washer lies underneath with a nut or screw firmly holding it down. Loosen the screw or nut affixed to the washer and remove the washer. Look around for any damages immediately you take it out. Yes! There is the wear and tear all around it causing the water to drip. Grab a washer and replace it with the damaged one you just removed.
Step 5: Put the tap back together
After successfully removing the old worn out washer and replacing it with a new one, you will in effect reverse the previous processes so to have the tap back as it was; only this time, it would not have any disturbing issues again. Just to recap, fix the valve in place and screw it but do not overly tighten the valve lest it causes another trouble. Put the tap top back on and secure that as well.
You can now open your tap and the water should be flowing as it should. Congratulations on a good job well done.

How to prevent leaking taps
For the most traditional taps which come with washers, you will experience leaking taps when the washer gets damaged. On the other hand, a damaged ceramic would cause tap leakages in monobloc lever taps which comes with ceramic discs.
Washers are easy to get worn out overtime as compared to ceramic discs which are hardly damaged, but that isn’t to say that they cannot be damaged and cause tap leakages. Traditional taps if used as often as possible or everyday, may in effect experience the wear and tear in some months as compared to monobloc level taps which have a higher resilience to wear and tear because they come with ceramic discs.
However, do not make the mistake of switching a washer for a ceramic disc simply because you know of the latter’s durability. You can have a plumber come replace all your taps to monobloc levels if you so wish and have the funds for that.
When is the time to replace a tap rather than fix?
Upon opening a faulty or leaky tap and you find out there is more than just a washer problem therein, it is time for you to completely change the whole tap rather than trying to fix it. This is so because it may not be long before other issues crop up and you will have to again go through the stress of replacing the tap altogether this time.

Source: www.Muzhchin.net